This post provides you details about setting up the Selenium Automation environment on your machine. After you prepare your machine with basic environment setup, you’ll be able to start automating and executing your test cases. Please follow the steps as mentioned below:
Creating Folder Structure on your System:
The first step to set up your environment is to create the appropriate file structure on your system.
Create root folders on your local drive:
C:\Automation
C:\Selenium
C:\Automation\Workspace [will refer to this as {workspace}]
C:\Automation\Lib
C:Automation\Maven
Create a subdirectory for the application under workspace directory: {workspace}\{APP Name} where {APP NAME} is your application name
e.g. C:\Automation\Workspace\MyFirstProject
Installation:
Install required software as listed below:
Java Installation:
Install the latest version of JDK, (windows x64 version):
Download Location: http://www.oracle.com/technetwork/java/javase/downloads/index.html
JDK (Java SE Development Kit) includes a complete JRE plus tools for developing, debugging, and monitoring Java applications. Thus, the user isn’t required to download and install the JRE separately.
Define a new system variable JAVA_HOME:
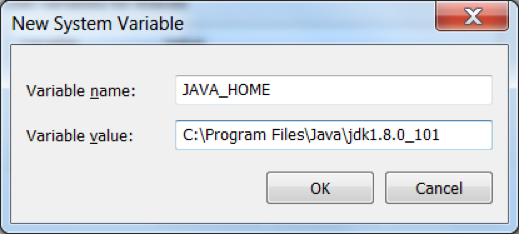
Also, add JDK location under the path:

IDE Setup:
Install Eclipse IDE at the default location (64-bit version)
Download Location: https://eclipse.org/downloads/
Selenium Setup:
Install Selenium Software under Selenium Folder
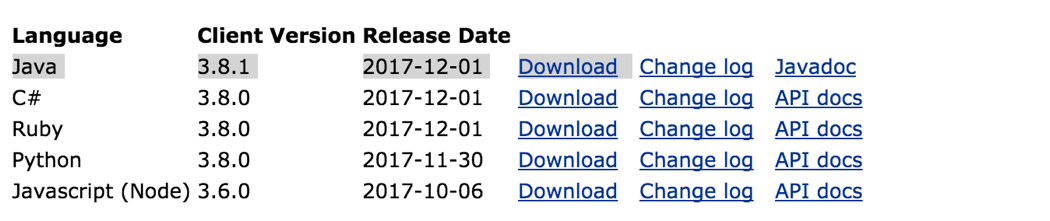
Open Selenium download section using this link: http://www.seleniumhq.org/download/
Scroll down a bit. You will see a section called Selenium Client & WebDriver Language Bindings. Here you will see download links next to different languages such as Java, C#, Ruby etc. Since we will be using Java with Selenium, you will need to download Java specific drivers. To do so, click on Download from the Java section. Once the file is downloaded, unzip it.
Open the unzipped folder. You will find a libs folder and one or two other JAR files in the Selenium folder. You would also see some other files such as LICENSE, NOTICE etc. Copy all these files to the folder named Selenium that you created earlier.
Note: You can also install Selenium under Automation-> Lib folder created above. It is just a matter of selecting the correct location for build path while executing in IDE.
Browser Driver Setup:
All browsers like Chrome, Firefox, Safari, Internet Explorer etc. requires an external entity (Driver Server for the browser) to be able to automate and execute the test script.
Download Driver Server for Chrome, Firefox & IE browsers
Google Chrome Driver
Internet Explorer Driver
Gecko Driver (for Firefox)
Maven Installation:
The installation of Apache Maven is a simple process of extracting the archive and adding the bin folder with the mvn command to the PATH.
Download Location for Maven: https://maven.apache.org/install.html
Step 1: Extract distribution archive in C:\Automation\Maven folder
Step 2: Add the bin folder with the mvn command to the PATH: C:\Automation\Maven\bin;
Step 3: You can confirm Maven Installation by running below command on command prompt
mvn -v
It will return information as shown below:

Installing Apache POI and PDFbox: (Optional)
Install Apache POI and PDFbox and place it under C:\Automaiton\Lib Folder
Apache POI – Java API for Microsoft Documents: It is an open source library developed and distributed by Apache Software Foundation to design or modify Microsoft Office files using Java program. It contains classes and methods to decode the user input data or a file into MS Office documents. (Use latest stable version.)
Apache PDFBox™ – An open source Java tool for working with PDF documents. This library allows the creation of new PDF documents, manipulation of existing documents and the ability to extract content from documents.
Setting up Eclipse Workspace:
Launch the Eclipse IDE. The application will prompt you to specify the workspace location. Workspace is that location where all your eclipse projects will be residing. Enter/Browse the desired location or the user can simply opt for the default location and click on the OK button.
Specify the workspace created above (C:\Automation\Workspace\{app name}); you can select “Use this as the default and do not ask again” if you like…
Close the Welcome window.
You have successfully completed your machine setup and you are ready to start writing your first Selenium Test Case.

Please comment with your real name using good manners.