We have learned how to create and initialize Git repository. Now we’ll learn how to work with our files and Repository. We’ll use Git Shell to execute our commands.
If you want to work with a repo, you need to be located inside of that so first we’ll navigate to our desired folder, in our case:
c:> cd GitHub/repo/GitBasic1
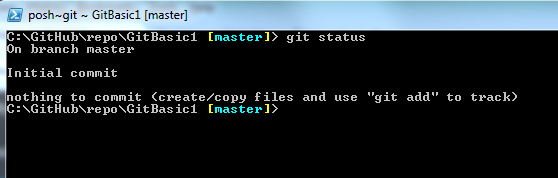
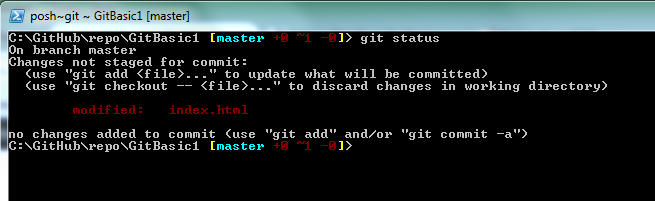
Checking current status:
git status
Check the current status of folder by using below command. Currently we don’t have any thing to commit so it will result below status:
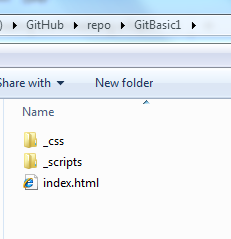
 Now we’ll copy some files that we want to track, into our GitBasic1 folder. We can copy the files in the repo using windows explorer
 Again run the status command and Git will inform you that there are un-tracked files. It is a good idea to get in the practice of using Git Status early and often when using Git to know the current status of repo.
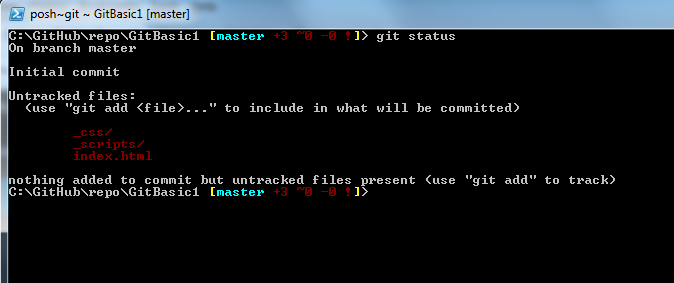 Git doesn’t just automatically track every file in the directory as soon as you put it there. It only tracks the files that you tell it to track. A file can be either tracked or untracked. The untracked files are the ones that have been added since the last commit. Now since we don’t have a commit as soon as we add some files to this folder automatically they are shown as untracked files.
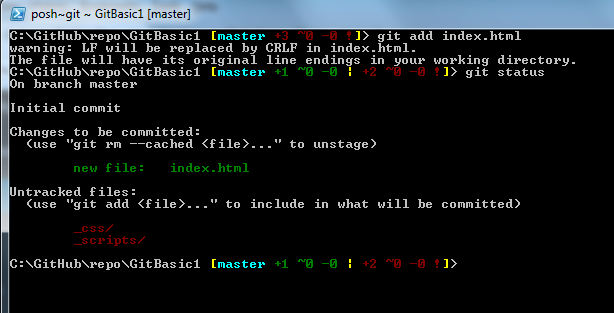
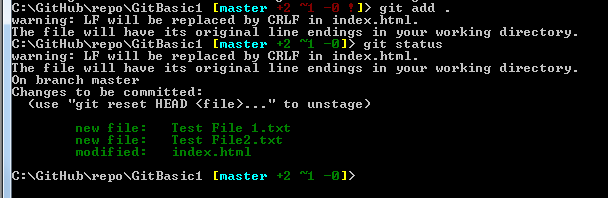
Staging newly added files in Git Repository
We can add our newly added files to staging using git add command. Type in git add and then a space and then the file name (such as index.html). After using the command, we’ll check the status using git status command:
There are a couple of ways that you can use to add files:
1. If you have few files , you can string ’em all together. So it would be git add first files name space and then another file name space and then another file name.
2. You can also use wild cards. If you wanted to add like all of the HTML files, for example:
git add *.html
3. If you want to add a lot of different files at once:
git add .
that is git space add space period. and then Hit Return.
Now it will showing all of files that have been added and are going to be available for our next commit. Now adding files like this adds them to the staging area. We need to add files when you copy new files or when you modify files later on. Now, once files have been staged, they’ll be included in the next commit.
Staging updated files in Git Repository
If you update any of your file after a commit and check git status, it will be shown as below.
 At this stage, if you add few more files to your working folder, it will be shown as un-tracked file.
 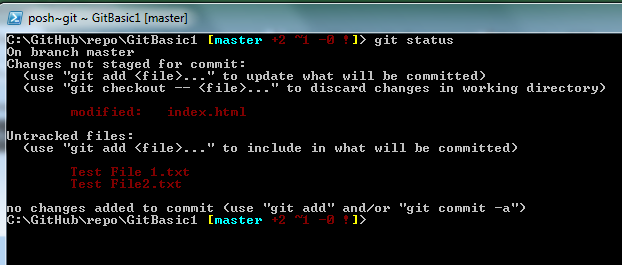 Ok, Now we want to stage all these files by using the git add command we learned i.e. git add .
As git add does not return any output so we’ll check new status of our files using git status command:
 We see that our changes are ready to be committed.
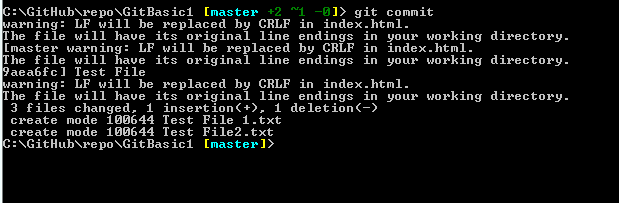
Making a Commit
Making a commit is actually taking a snapshot of the project at that moment in time. We can commit staged files by using git commit command as below:
 When we enter git commit command, a file opens in text editor. This provides you an opportunity to record details about changes done by you. After you enter the detail, just save and close the file and you’ll be back to command line with further details for the commit.
 You commit is done. Let’s check the status again:
 And it shows nothing to commit. The working directory is clean. That means we’ve just taken a snapshot.
You can also use below command as an efficient way of committing where it won’t open us text editor and will save your short message to record details about your commit.
Git commit – m “Test message for Commit”
Where “Test message for Commit” is our message we want to record about our commit.
And you are Done!

Please comment with your real name using good manners.